|
By| Jan 04,2019 10:31 am iMovie is no longer free for Mac users to edit videos. So you need to look for other free video editing software for Mac (macOS 10.14 Mojave included) as alternative solution. No need to search around the internet, here you can get top 9 free video editor for Mac listed below that are sure to accomplish all your video editing needs. 
Edit a wide variety of video file formats to make them your own customized movie experience. Mac video output adapter. Add effects, subtitles, music.you name it. When it comes to video editing, your creativity is the limit. Top 9 Best Mac Video Editing Software You Should Know #1. 4 days ago - Check out our list of the best free video editing software for your. Apple's iMovie has long been one of the most consumer-orientated video editors out there. The ability to start editing on iPhone or iPad and finish on a Mac. Filmora Video Editor (Mac and Windows) Why settle for a simple and limited video editor when you can have it all? Brings all tools into one amazing program that enables video editing, and is also a video converter. Edit video and convert video at will, for virtually all formats available and a huge array of devices. Whatever you need, Filmora Video Editor for Mac has it! Or, if you're absolutely just looking for a dedicated video editor, we also have the best solution. Try our Filmora Video Editor for Mac! The best video editor for Mac (macOS High Sierra included) in the market. I test and review the products to see if it's worth your hard earned money. Logitech solar keyboard k750 software. • Supports almost all video, audio and image formats. • Makes amazing movies with 300+ new eye-catching effects. • Allows you to add music to video or crop/trim/merge videos. • Full compatible with macOS 10.6 or later including macOS 10.13 High Sierra, and Windows 10/8/7/XP/Vista. Avidemux is an open source video editor for Mac that will make encoding, filtering, and cutting a breeze. Download driver for hp photosmart d11…. Incomparison to other video editors for Mac, this video editor for Mac is compatible with different video formats such asDVD, MPEG, AVI, and many more. 
It also supports some audio formats including WAV, AAC, MP3,among others. If you are a beginner in video editing, there is no need to worry because it's very easy touse and will allow you to edit your video files without experiencing any inconvenience. Like all videoediting programs, this tool is easy to install. It can also be downloaded easily. For first time users, thereis a detailed tutorial provided. It also comes with advanced features that will provide total conveniencefor all users. However, for non-tech savvy people, you might find some of its functions confusing. But,with its user-friendly interface, you won't need to study numerous tutorials. Blender is an free video editing software for Mac and free 3D rendering program, which features the best list of animationessentials such as modeling, rigging, interface, animation, shading, UV unwrapping, real time 3D gamecreation, and so on. This also has a pack of high-end interface that is loaded with intrinsic and usefultools. But, like most video editors, this has also pros and cons. When compared to some video editors, this video editor for Mac is a video editor that provides professional 3D quality that is available for free. It has a lot of featuresand ideal for every 3D enthusiasts, graphic artists, and designers.
0 Комментарии
By • 1:00 pm, January 13, 2016 • • Apple TV's new app could give us the interface we've dreamed of. Photo: Jim Merithew/Cult of Mac So you’ve got a fourth-generation Apple TV (the one with Siri Remote and all the apps) and you’ve just downloaded that was just ported to tvOS. The last few versions of Apple TV haven’t included any storage for video files, and the same is true of the latest model: All the device’s storage is for apps and associated media files. Getting your own videos up on the big screen using VLC takes a little finesse. How to enable gpu accelerated decoding in VLC. On Mac OS X only H.264 is supported right now and on Linux, it depends on whether an Intel or Broadcom graphics. Feb 25, 2011 How To Create Video Clips on VLC Using Mac. However if you look at the VLC 2.2 version the View option does not have the Advanced Controls option as it says in the tutorials. It only has 'show previous and next buttons', show shuffle and repeat buttons', 'show audio effects buttons and ' show sidebar'. 
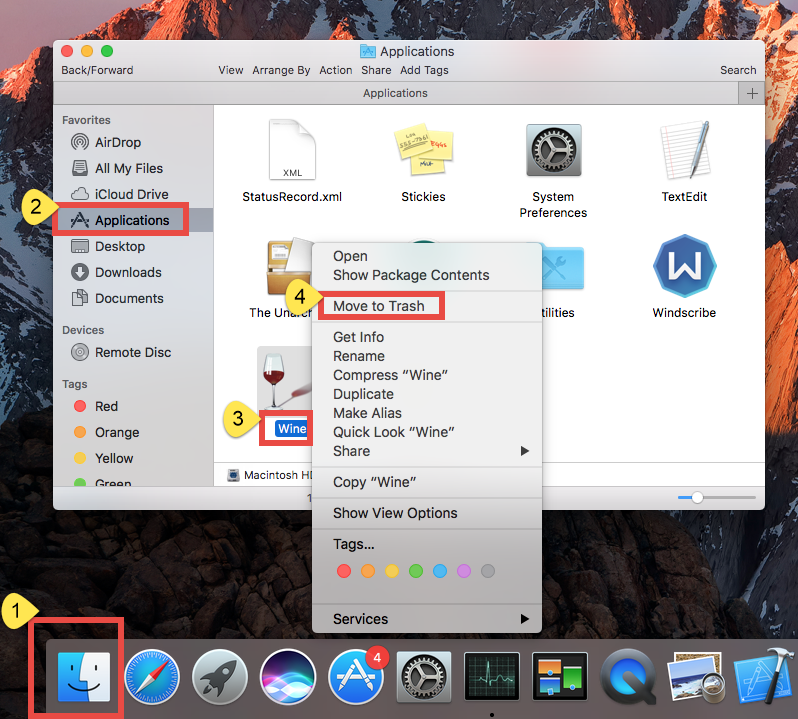
Here’s how to watch any video (with a few caveats) on your Apple TV via VLC. First up, while VLC will play any video you can throw at it, AC3 audio support for.avi files doesn’t seem to be working. If you try to play a file in this format, you’ll be able to see the video, but it won’t have any sound. All the other video formats that I’ve tried, including.mkv,.mp4 and.mov files, work just fine. There are three basic ways to get VLC on Apple TV to play your videos: Local Network, Remote Playback or Network Stream. You’ll need some sort of media server, like Plex, for the first one, a web browser for the second, and a web or FTP server for the third. Let’s take a look at each in order. Local Network Use your own media server to watch on Apple TV. Photo: Rob LeFebvre/Cult of Mac VLC supports Universal Plug and Play (UPnP) media servers () and FTP servers running on your local network. The great thing about Plex is that there’s an Apple TV app and a Mac server that will do all the work for you – just point it to a folder full of media files on your Mac and turn it on. If you’ve already got a media server like Plex up and running, using VLC to access the movies stored there is super simple. Launch VLC on your Apple TV, swipe left to go to the “Local Network” tab, and you’ll see your server there. Just click through to your movies and they should play without effort. What’s great here is that if your server doesn’t support certain file formats, VLC should be able to. Remote Playback Use your web browser to get videos over to your Apple TV. Photo: Rob LeFebvre/Cult of Mac If you’re not keen on running a server off your Mac, then the next best option is to use VLC’s remote playback function. Meanwhile, you can execute the deletion by (2) right-clicking the app and choosing Move to Trash, or (3) by selecting the app and heading to File menu > Move to Trash. Swipe over to the Remote Playback tab at the top of the VLC screen on your Apple TV, and then you’ll see the screen above. Click on the Enable Remote Playback button and you’ll get two addresses, one with your local IP address (above) and one with the more easily read local network address (above). Type either into your web browser and you’ll get a web page that lets you drag and drop videos into it to watch on the big screen. Web page looks like this. Dropbox will download any updates the installer needs and then start the installation process. Once the basic installation is complete, a Dropbox icon will be added to your Mac's menu bar, the Dropbox app will be installed in your /Applications folder, and you'll be presented with the Dropbox sign-in window. Here are the steps to change font size in the Notes pane: 1. In PowerPoint, choose View>Outline View from the OS X menu bar at the top of your screen. Right-click in the Outline area to the left of the slide preview and choose Show Formatting. Right-click in the Notes pane. Apple notes. How to Change the Font Size for Notes in Powerpoint 2013 January 18, 2017 By Matt The speaker notes that you include on your Powerpoint presentation slides can be very important, so you might be looking for a way to change the font size of your notes in Powerpoint 2013. I have Powerpoint in the view mode that shows my presentation in the main window, thumbnails to the left of it and notes below. The font in the notes window is tiny and I can't figure out how to increase the size. I click in the notes window and go to the font size menu and increase the size, but it doesn't affect the size of the notes text. Rm -R.dropbox-two Acknowledgements Dropbox Encore was inspired by pioneering discussion: • The ' Have More Than One Dropbox Account' topic in the original Dropbox Forums. • The 'Multiple Dropbox Instances on UNIX systems (Linux, Mac OS X)' topic in the now-defunct official Dropbox TipsAndTricks Wiki. See the similar ' topic in the new user-supported. Many thanks to Richard Bao for tracking down the cause of the problem. Sveinbjorn Thordarson's developer tool created the Dropbox Encore application from a 2-line bash shell script. The Joy of Macs thanks the for providing a wonderful Internet cloud service. And thanks to Dropbox Encore users for helpful feedback. 
Feedback Please send questions & comments to, including the following information: • Dropbox version (from Dropbox Preferences > Account) • Dropbox Encore version (from Get Info on the Dropbox Encore application) • macOS version Revision History 12 Jan 19 – 1.1b1: Dropbox Encore is a 64-bit application for macOS High Sierrra (10.13) and Mojave (10.14); update the Dropbox Set Up screenshots. 02 Apr 18 – Announce compatibility with macOS High Sierrra (10.13). 20 Jul 17 – Add to Known Problems. 30 Sep 16 – Announce compatibility with macOS Sierrra (10.12). 04 Aug 15 – Add to Known Problems. 29 Jul 15 – Add instructions. 08 Jun 15 – Clarify the notes. 13 Apr 15 – Add a note about. 04 Nov 14 – Announce compatibility with Yosemite (OS X 10.10); add two Known Problems:. 22 Jan 14 – Add a fix for the problem. 27 Dec 13 – Replace the 'In the event of a Dropbox Encore problem.' Section with an expanded section. 26 Oct 13 – Announce compatibility with Mavericks (OS X 10.9). 14 Oct 13 – Test with Dropbox 2.4.2 on Mac OS X 10.6.8 and 10.8.5. 03 Jun 13 – Clarify the that the user's home folder must be on the startup hard drive. 18 Mar 13 – Add an 'In the event of a Dropbox Encore problem.' Section; test with Dropbox 2.0.0 on Mac OS X 10.6.8, 10.7.5 and 10.8.2. 21 Jan 13 – Add note about Dropbox in /Applications folder; test with Dropbox 1.6.15 on Mac OS X 10.6.8, 10.7.5 and 10.8.2. 17 Nov 12 – Test with Dropbox 1.6.0 on Mac OS X 10.6.8, 10.7.5 and 10.8.2. 08 Oct 12 – Note compatibility with Mac OS X 10.8.2. 26 May 12 – Test with Dropbox 1.4.7. 16 Feb 12 – Test with Dropbox 1.2.52. 12 Dec 11 – Update the notes for newer Dropbox 1.2 releases; update the pioneering section of the (thanks to Kevin Ernst). 10 Aug 11 – Update the notes for Dropbox 1.2.24. 23 Jul 11 – Add & Dropbox 1.2.16 caution notes; add a new. 04 Jul 11 – Add Dropbox Setup &. 21 Mar 11 – 1.0: release with no functional changes from 1.0rc1; add a note about icons to the; add notes. 05 Oct 10 – Clarify the N.B. 02 Oct 10 – Expand the; correct typos. Excel for mac student discount. 18 Sep 10 – 1.0rc1: rename to Dropbox Encore. 23 Aug 10 – 1.0b2: change to a background application. 07 Jun 10 – 1.0b1. You can easily back up your Quicken files with Dropbox; to get started, just follow the steps below. Note: if you want to share your Quicken file between computers using Dropbox, please read this first. • Go to Dropbox.com and sign up for a free account: • Install the Dropbox app on your Windows or Mac computer: • After installing the app, you'll find a new Dropbox folder on your computer. Anything you place in that folder will automatically back up to Dropbox. For step-by-step instructions on backing up to Dropbox, see the articles below: • • Dropbox also has detailed Help and Getting Started instructions at their website: • - Dropbox Help Center • - Introductions to Drobox and How-to videos • - Guided help for specific questions • - a simple tour of Dropbox features. † Limited time offer of 40% off the list price applies only to the purchase of Quicken Deluxe, Premier, Home, Business & Rental Property for the first year only when you order directly from Quicken by Feb 5, 2019, 11:59 PM PST. Offer good for new memberships only. Offer listed above cannot be combined with any other offers. Terms, conditions, pricing, features, offers and service options subject to change without notice. 
Available on Quicken for Mac (all versions) and Quicken for Windows (Deluxe and above). Schedule A through E reports are based upon data provided by Quicken user or downloaded account transaction details. Consult your tax professional to verify correct categorization and calculation of expenses before you file. Is there a quickbooks premier for mac. Feb 6, 2012 - What you're seeing is a temporary view of your spreadsheet inside. See the highlighted text: “Worksheet in PowerPoint Slide Show.”. July 15, 2014 at 5:54 pm. Excel spreadsheet, you can insert the chart into PowerPoint and link it. I am using Office for Mac 2016 and struggle finding “Object Actions”. 
By Chandni Trehan, Why do we often have to link Excel and PowerPoint? And are often used together at companies to produce Financial reports, Audit Reports, Due Diligence Reports, Pitch Books, Investment Memorandum, Portfolio Reviews, etc. 
This list has no end and we could easily ask ourselves how many hours or days are spent every year by employees to produce reports. When it comes to budgeting and long-range planning tools, Microsoft Excel continues to dominate:. While Excel is frequently used by accounting and finance professionals at businesses of all sizes, the survey responses indicate it is especially popular with smaller companies (less than $25 million turnover annually). Excel is the leading tool for preparing advanced financial analyses and PowerPoint is the main way results are presented. People often copy and paste tables and charts from Excel and add comments. However, when your data changes in Excel (typical business case: you recieve the new period’s figures from your ERP system), you need to update all the tables and charts in PowerPoint without making any mistakes. In situations like this, users may want to somehow link their Excel data with PowerPoint. Has found different options available to link data between Excel and PowerPoint, to save you time How to link Excel with PowerPoint natively in Microsoft? The main differences between linked objects and embedded objects are where the data is stored and how you can update the data after it’s inserted in your presentation. This means the infomation doesn’t change if you modify the source Excel file. Once embedded, the object is no longer part of the source file and won’t reflect any changes made. Let’s focus on the linked object First way is using Paste Options • Open the Excel workbook that has the chart that you want. • Select the chart. • On the Home tab, in the Clipboard group, click Copy or press Ctrl+C. • Open the PowerPoint presentation, select the slide that you want to insert the chart into. • On the Home tab click the arrow below Paste, and then do one of the following: • If you want the chart to keep its look and appearance from the Excel file, select Keep Source Formatting & Link Data. • If you want the chart to use the look and appearance of the PowerPoint presentation, select Use Destination Theme & Link Data. Then, to update your data: • Case 1: PowerPoint and Excel are opened and you just created the link: • The update is automatic. Any changes on the Excel are automatically impacted on your presentation. • Case 2: Excel file (saved or not) is opened and you open your PowerPoint presentation: • Right click on the chart and “Edit Data” or “Edit Data in Excel” Note: Do the same if PowerPoint is already opened and you open your modified Excel file. • Case 3: Your Excel file is closed: • “Edit Data” will open the linked data on a basic spreadsheet just to make changes on the input. Changes made here will be saved to that spreadsheet and it will impact your source file. The interface is limited. • “Edit Data in Excel” will open the source file. Limitations • If you move the Excel file to another folder while the PowerPoint file is closed, the link between the chart in the PowerPoint presentation and the data in the Excel spreadsheet breaks. • If you duplicate your Excel file the link will be broken with the new version. • The update is not available when pasting tables Second way is using Paste Special • Open the Excel workbook that has the chart that you want. • Select the chart. • On the Home tab, in the Clipboard group, click Copy or press Ctrl+C. • Open the PowerPoint presentation, select the slide that you want to insert the chart into. • On the Home tab click the arrow below Paste, and then click Paste specials • Select Paste Link • Select “Microsoft Excel Worksheet Object” or “Microsoft Excel chart Object” if it is a chart Then, to update your data: • Case 1: PowerPoint and Excel are opened and you just created the link: • The update is automatic. Any changes on the Excel are automatically impacted on your presentation. It allows you to format partition to exFAT, FAT32, NTFS, Ext2 and Ext3 and Ext4 on external hard drive, internal hard drive, USB flash drive and SD card. It can work with Windows 10/8/8.1/7, XP and Vista. If you’re willing to run Windows on your Mac, then this happens to be one of the most simple and powerful ways to partition hard drive on Mac. Mac’s inbuilt Boot Camp assistant eases down all the process and guides you with simple on-screen instructions. Storage space has always been one of the major concerns while using any gadget. No matter how much space any device has, we still crave for some extra gigabytes—one can never get enough of it! Whether it’s your Mac, iPhone or any other device, they all come with a specific finite amount of space which sooner or later gets occupied with our personal data. So, if you have ever wondered how to partition a hard drive on Mac you’ve landed at the right spot. You can upgrade your Mac’s hard drive in two ways—either you can upgrade it internally via SSD or by connecting your Mac to an external hard drive. Quicken for mac wiki. Want to how to format your external hard drive? Learn here, how to erase and format an external hard drive. Before we proceed further, first let’s understand a few perks to partition hard drive on Mac Benefits of Partitioning your Mac’s Hard Drive One of the most common reason why individuals tend to partition their Mac’s hard drive is when they want to run more than one operating system like Windows and Mac. So, once you are through on how to partition external hard drive of your Mac you can easily manage both the operating system separately as if they’re running on two different devices. Popular free games for mac. Just Remember Before you decide on partitioning your Mac’s hard drive here’s a quick tip which’ll help you get through with this process without any hassle. You can download tool which can optimize your Mac’s hard drive and make your device a lot more stable. 
It can enhance your Mac’s speed with ease and improve your experience exclusively. So, before you partition your Mac’s hard drive just make sure you declutter the hard drive with a powerful and effective tool like. How to Partition your Mac’s Hard Drive or SSD There are basically two ways to disk partition your Mac: First is using Bootcamp and other is with the help of Disk utility. Let’s discuss both of these ways in detail. Using Bootcamp If you’re willing to run Windows on your Mac, then this happens to be one of the most simple and powerful ways to partition hard drive on Mac. Mac’s inbuilt Boot Camp assistant eases down all the process and guides you with simple on-screen instructions. 
Once you through with the process, you can run both operating system (Windows and Mac) on your MacBook. But apart from this reason, if you want to partition your Mac’s hard drive then you can use the second way which is via Disk Utility that we’ll be discussing in our next section. Using Disk Utility If you’re sole purpose is just to partition your Mac’s hard drive, then using a disk utility manager might be an ideal choice. Disk utility acts like a smart Mac Partition manager and is a useful in-built Mac application that sits within your Utilities folder, inside Applications folder. Before your start up with this process, just make sure that you back up all your important data, create a clone on your entire hard drive, just in case anything goes wrong. Here are a few things you might want to consider before you jump on partitioning your Mac’s hard drive via Disk utility. • Clone your Mac’s hard drive. • To double check whether this clone works or not, plug the clone in and go to System Preferences > Startup Disk. • In this way you can make sure that the cloned drive is successfully working, and you can proceed to partition your Mac’s hard drive without any worries. How to Partition Mac Hard Drive via Disk Utility Here are few steps you need to follow to disk partition your Mac via Disk utility. • Head on to Utilities> Applications Folder or tap Command + Shift+ U key. • Double-click the Disk Utility application. • Now select your Mac’s internal hard drive name. • Tap on Partition. • Tap the ‘+’ below Partition Layout. • Once the new partition appears, you can change the size of both disks accordingly. • Assign a name to your newly partitioned disk drive. • Tap on “Apply” to save changes. Read this to know how you can secure your Mac as it is important to keep it in mind if. If you’re unhappy with the disk partition, you can anytime revert back to old state. With the advances in technology, faster data access (SSD), and slimming hardware footprints, legacy technologies are typically the first cuts made to get these devices thinner and lighter while making them more powerful and efficient. Installing OS X has never really been a particularly difficult task, but try doing that on a MacBook Air or a system with a broken optical drive. Not so easy anymore is it? Even downloading the OS from the Mac App Store wouldn't do when the hard drive needs replacing or the Recovery Partition is corrupt. 
In Terminal, type one of the following commands, depending on your version of macOS. (The name of OS, is the one you want to install on the key. Luckily, Macs have a couple of options, specifically USB booting, and since most have an SD card slot, we can use those as well. Creating a USB Installer for Apple OS X 10.7-10.8 Before proceeding, we'll need the following items to complete the process: • 8GB USB Flash Drive (or SD Card) • Install OS X Mountain Lion.app (installer downloaded from Mac App Store) • Apple computer with Mac App Store (OS X 10.6.8+) • User Account with Administrative privileges Follow these steps: 1. Using a Mac with at least OS X 10.6.8 installed, access the Mac App Store and download the Lion (10.7) or Mountain Lion (10.8) app installer. Insert the USB drive into the Mac and launch Disk Utility. Click on the USB drive from the left-hand menu and select the Partition tab. Click the drop-down menu, selecting 1 partition. Select Mac OS Extended (Journaled) for the format-type from the drop-down menu. ( Figure A) 6. Click on the Options button and select the radio button for GUID Partition Table and click OK. ( Figure B) 7. Upon completion of the USB formatting, locate Install Mac OS X Mountain Lion.app (downloaded in step #1 to the Applications folder, by default). Right-click the file and select Show Package Contents. ( Figure C) 8. 
Navigate the file structure Contents| Shared Support and drag the InstallESD.dmg file to the desktop. ( Figure D) 9. Go back to Disk Utility and click on the newly formatted USB Drive in the menu, then click on the Restore tab. In the Source textbox, click the Image button and select the InstallESD.dmg file on your Desktop. For Destination, drag & drop the partition created on the USB drive onto the textbox. Effective library management. An “Add movie” button will be present on the toolbar. Surf files to the desired location, name the database, and click the “Save” button. ( Figure E) 11. Upon verifying that the fields are correct, click the Restore button and select Erase from the application, if prompted to do so. ( Figure F) 12. The process may indicate in excess of one hour, but in my experience the process takes significantly less time to complete. ( Figure G) Creating a USB Installer for Apple OS X 10.5-10.6 The process is nearly identical, with a few alternate items to complete the process: • 8GB USB Flash Drive (or SD Card) • Apple OS X Install DVD* • Apple computer with (OS X 10.5+) • Built-in or USB Optical Drive • User account with Administrative access *Note: Install DVD must be the original DVD from Apple and not a Restore DVD that came with earlier model Apple computers & laptops. The process has not been tested with Restore DVDs and may not yield a reliable, OS X Installer USB. • Insert Apple OS X Install DVD into Optical Drive. File Card, Menu bar app, Spotlight Search DETAILS: 1) File Card File Card is a new note card type in Notebook. Notebook software for mac. 
What is QEMU for Windows - PPC emulator, runs Mac OS 9.1, 9.2 + OSX 10.0 to 10.5? QEMU is a very versatile and extremely broadly supported open source virtual machine emulator. In 2016, QEMU could finally achieve what has never been possible before: emulating Mac OS 9.0.4, 9.1 and 9.2.2 (albeit still it's quite slow and the sound support is kind of buggy at the moment). Jan 17, 2014 - Microsoft's Windows and Apple's Mac operating systems have. The emulator is in black and white rather than color, and you can't save. Coder Michael Vincent's website provides a functional version of Windows 3.1 from. Want to play classic Windows and DOS games on your Mac, but unsure where to. Wine, which was initially shorthand for Windows Emulator but now stands for. Note that QEMU can also emulate Mac OS X 10.0 up to 10.5. At some point in the near future hopefully, QEMU will fully replace, but at the moment, SheepShaver still runs faster in most situations. Advantages of using QEMU vs SheepShaver: • Mac OS 9.1.x and 9.2.x emulation (SheepShaver cannot) • Much more stable networking (SheepShaver randomly crashes while using the networking features) • Cursor animation (or anything else for the matter) does not reset the pointer in the host OS (SheepShaver does and it's annoying!) • QEMU can run on almost all imaginable CPU architectures, even ARM (e.g.: Raspberry Pi) These bundles were put together by 'that-ben' and are intended to be the easiest possible for beginners. Just launch the 'QEMU - Mac OS 9.2.2.bat' (or 'QEMU - Mac OS X Tiger 10.4.11.bat') file and wait 30 seconds for Mac OS to boot up. Nevermind the yellow screen with a VRAM partition not found error, it will go past this without any problem. The Mac OS 9 package contains a 450MB disk image on which Mac OS 9.2.2 is already fully installed. The Mac OS X package contains Mac OS X 10.4.11. If you need a larger disk image, you can grab one instantly from here: Networking is functional thanks to the Realtek rtl8139 driver for Mac OS 9, which is pre-installed here for you already. It will use DHCP and network through your host Windows machine. 741 / 2017-12-18 / 3610454fff128182efa343478e86ca587fe940c3 / / Architecture Intel x86-64 Compatibility notes This program is for Windows. USEFUL TIPS WHEN USING QEMU: • To install another Mac OS version, exit QEMU if it's running and then simply edit the 'QEMU - Boot with a CD ISO.bat' command file with the Notepad to reflect your actual install CD ISO file location and launch that batch file. • To capture/uncapture the mouse pointer, hit CTRL-ALT together. Since 2018, it's now CTRL-ALT-G. • To go toggle the full screen mode on or off, hit CTRL-ALT-F. • Hit CTRL-ALT-2 together to open/close the QEMU console. DO NOT HIT THE X TO CLOSE THAT WINDOW OR IT WILL INSTANTLY EXIT THE WHOLE QEMU AND THE VIRTUAL MACINTOSH WITH IT. 
• To hot-attach a disk image ISO, in the QEMU console, adapt this command: change ide1-cd0 C:/path/to/file.iso • To hot-detach a disk image ISO, first in OS9, put it the trash, then in the QEMU console, type this: eject ide1-cd0. Excel for mac student discount. Newegg.com - A great place to buy computers, computer parts, electronics, software, accessories, and DVDs online. With great prices, fast shipping, and top-rated customer service - Newegg shopping upgraded ™ If you are reading this message, Please to reload this page.(Do not use your browser's 'Refresh' button). Please if you're running the latest version of your browser and you still see this message. If you see this message, your web browser doesn't support JavaScript or JavaScript is disabled. Mac computers without built-in trackpads won’t allow Bluetooth to be turned off unless a USB mouse is connected. Bluetooth is offline and unavailable. Restart your Mac. Au printing for mac sierra. If the Bluetooth status doesn’t change, disconnect all USB devices and restart your Mac again. Free ultraedit for mac. 
Please enable JavaScript in your browser settings so Newegg.com can function correctly. Notes, cautions, and warnings NOTE: A NOTE indicates important information that helps you make better use of your computer. • Drivers and Documentation media • Quick Setup Guide • Safety, Environment, and Regulatory Information (SERI) Product Features. In addition, you can review all the displays, projectors, software and accessories available from Dell. C5517H, for an all-in-one solution that simplifies access to. Driver and Software Download For Windows MacOS and Linux. Dell 1125 MFP Simple to use, it’s quick at printing colour and black text but was a little slower gone it comes to photos. It has some simple features such as letting you scan directly from the Dell 1125 MFP printer, rather than requiring you to entre software upon your PC, and it will even make aware you if you’ve left the item you’re scanning in the printer. This Dell 1125 MFP Printer is a great printer if you desire to print lots of black or colour documents quickly and relatively cheaply. Easy to use, the print tone is great but we did locate it was slow gone it came to reproducing photos. It’s cost-effective too, at concerning 3p per black print and 7p per colour print. However, it’s bulky and does understand happening a lot of room. Dell 1125 MFP Driver Download Print Quality Print tone in mono is amazingly acceptable, while in colour, it produced well ahead results to the same-style Dell 1125 MFP. Plain text appears in a bold pigmented black gone smooth characters and no sign of smearing or running. The ink seems rather heavier than it would gone a laser printer, but it is consistent. Dell 1125 MFP Print tone has always been a bit contentious, back considers it lovely good, and the printer that sold shows that customers tone much the same. But gone I compare results gone those from machines gone thermal printheads such as Canon and HP text isnt as sharp and colours arent as bright. Dell 1125 MFP Software Download Unlike many printers which require you to software your computer to use the scanner, this printer allows you to scan using the touchscreen the printer itself. However, this means it can longer than devices to scan. • Can be used to print paper happening to A3 and offers automatic double-sided printing • Good choice of connections – it offers both wireless and ethernet connections • Printer features a simple audible and visual alert if you’ve left a document upon the scanner glass Bottom line The Dell 1125 MFP is a hermetic all-in-one. Print tone is fair, however, rather than spectacular and although this is a decent multi-function device overall, the competition is strong. Few printers can be described as attractive and the Dell 1125 MFP is agreed not one of them. Its larger than your average A4 MFP, yet it cannot maintain as many A4 sheets in its single paper tray. Thats because of its A3 printing capacity of course, but remember that it cannot scan (or copy) at that size. The best free video downloader for mac. Appropriately if youre unlikely to habit large format printing, youll save child maintenance and bulk by choosing a vary model. Quicken for mac review. Name Size Relase date Component OS Download link Dell DDM Monitor Application 1.06 MB 28 Sep 2016 Drivers for OS Deployment Windows 7, 32-bit, Windows 7, 64-bit, Windows 8.1, 32-bit, Windows 8.1, 64-bit, Windows 8, 32-bit, Windows 8, 64-bit, Windows 10, 32-bit, Windows 10, 64-bit Dell C5517H Monitor Driver 374.81 KB 28 Sep 2016 Drivers for OS Deployment Windows 8.1, 64-bit, Windows 8.1, 32-bit, Windows 7, 32-bit, Windows 7, 64-bit, Windows 8, 32-bit, Windows 8, 64-bit, Windows 10, 32-bit, Windows 10, 64-bit. The option to request read and/or delivery receipts is on the compose mail Options ribbon and Draft menu. If you are not familiar with receipts (because Outlook for Mac did not support it), receipts are notification that the message was received or read. • Delivery receipt: send a notification mail when the email has been delivered to the mailbox. 
• Read receipt: send a notification mail when email has been opened by the recipient Not all email clients can return read receipts and recipients usually have the option to not return one. Samsung scx-3405w wireless setup mac. Neither receipt option will guarantee you that the message was placed in the Inbox or read. The read receipt only tells you that the recipient marked the message read. Video editing mac or pc. Does Outlook for Mac 2016 have message receipts? Like many other users, my email communications require the use of message receipts (sometimes called 'read receipts'), which provides the sender with an acknowledgment by the recipient that the message has been received and opened. If the recipient reads it using a client that does not support receipts or has an option to not return receipts, you won't get one back. A 'deleted unread' receipt tells you that the recipient deleted a copy of the message without marking it Read, it does not guarantee they didn't read it without marking it read. Delivery receipts, if supported, will tell you the message made it to the recipient's mailbox. If the server doesn't support returning receipts, Office 365 generates a message that the message was handed off to the server and Office 365 doesn't know what happened to it. If the recipient uses an email client that supports responding to read receipts, you should receive notification when the message is read or deleted unread, provided it's not filtered out by antispam software. |
АвторНапишите что-нибудь о себе. Не надо ничего особенного, просто общие данные. Архивы
Март 2019
Категории |
- Blog
- Garrys mod nude alex
- Breeze Systems Nkremote Keygen
- Loverslab fallout 4 clothing
- Petite summer lin perfect bj
- Jenny mod minecraft download 1-17
- Microsoft ccleaner download free
- Mutilate a doll 2 custom items download
- Tf2 demoman ed edd n eddy sound effects
- Revo uninstaller pro serial number free
- Beyond two souls choices map
- How to download tinytask
- Download youtube videos 1080p

 RSS-канал
